

Lets deploy one Java based web app called registration app using Tomcat application server. Tomcat server is ideal choice for hosting Java web applications.
Follow below steps to the deploying this app.
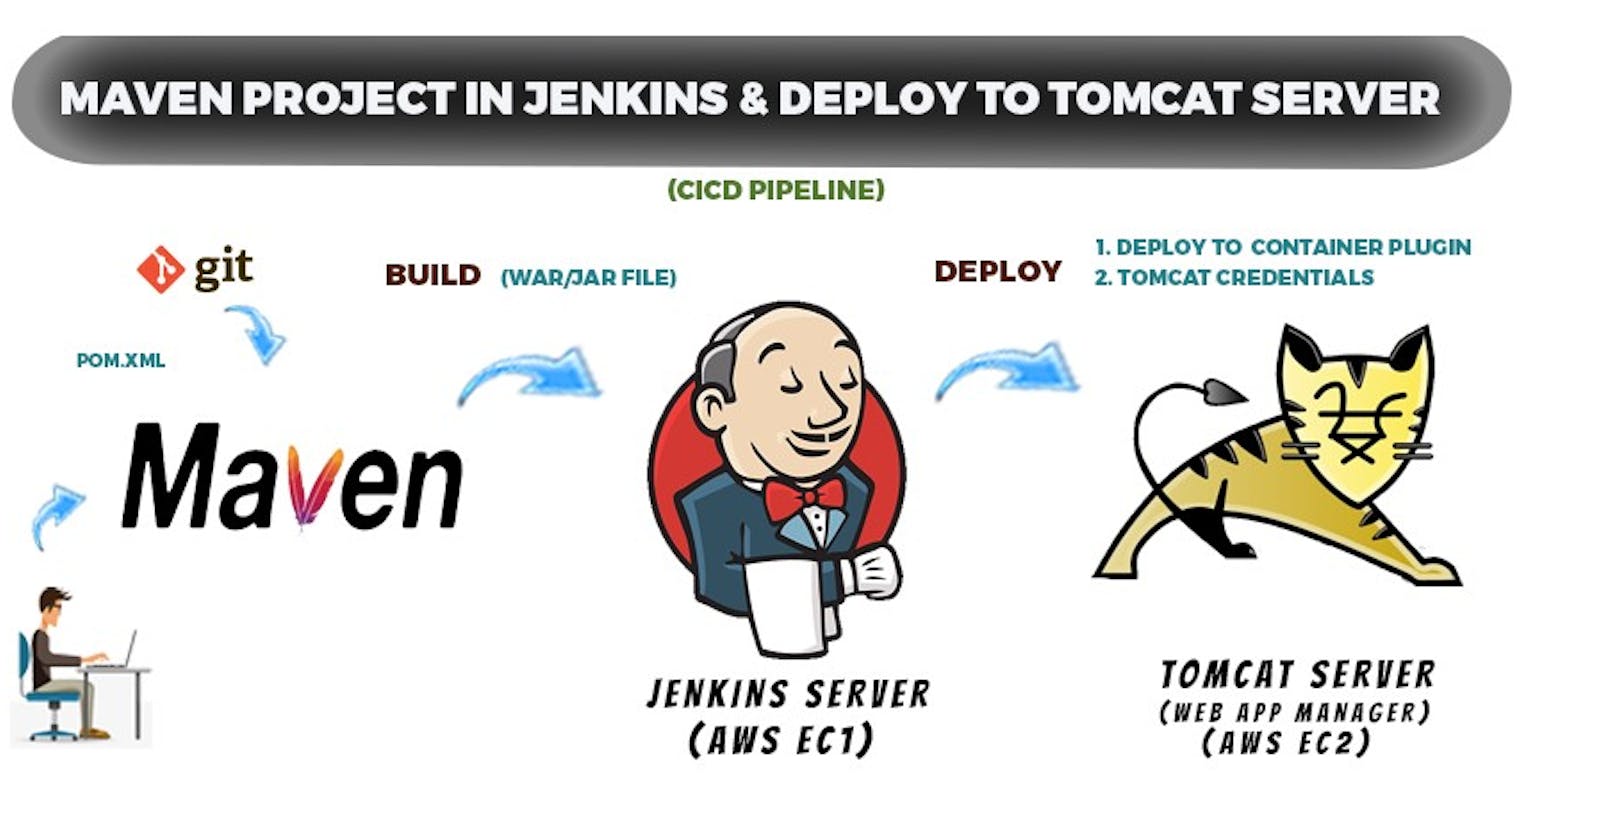
🪄Launching Jenkins on EC2 Instance: The first step was setting up an EC2 instance on AWS and installing Jenkins to facilitate continuous integration and deployment.
🪄Installing and Configuring Maven: To manage dependencies and build the project, I installed Maven, a popular build automation tool, and configured it to ensure smooth project compilation.
🪄Setting up JDK: Java Development Kit (JDK) was installed to enable Java development on the EC2 instance.
🪄Integrating Jenkins with GitHub: I connected Jenkins to my GitHub repository, allowing it to trigger automated builds and deployments whenever new code changes were pushed.
🪄Setup Tomcat Server 🐈: Next, I installed and configured Tomcat, a widely used web server, and servlet container, on the same EC2 instance to host our JSP application.
🪄Integrating Tomcat with Jenkins: I integrated Tomcat with Jenkins, enabling seamless application deployment to the Tomcat server during the build process.
🪄Deploying the JSP App to Tomcat: Leveraging Jenkins, I set up the deployment process to automatically push the JSP web app to Tomcat after successful builds.
🪄Poll SCM: To ensure timely updates, I configured Jenkins to poll the GitHub repository for changes periodically, triggering builds and deployments as needed.
Project App URL : AasifaShaik029/registration-app (github.com)
Launch Jenkins using ec2 instance

Follow these steps to install jenkins in ec2 👇
install-jenkins-unbuntu (trainwithshubham.com)

ipadress of the instance:8080. we launched jenkins through ec2 instance.

Install and configure Maven
Install Maven Commands
------------------
cd /opt/
sudo wget http://www-eu.apache.org/dist/maven/m...

sudo tar -xf apache-maven-3.5.3-bin.tar.gz
sudo mv apache-maven-3.5.3/ apache-maven/

sudo update-alternatives --install /usr/bin/mvn maven /opt/apache-maven/bin/mvn 1001

Configuring Apache Maven Environment
------------------

$ cd /etc/profile.d/
$ sudo nano maven.sh
###################################################
# Apache Maven Environment Variables
# MAVEN_HOME for Maven 1 - M2_HOME for Maven 2
export JAVA_HOME=usr/lib/jvm/java-11-openjdk-amd64
export M2_HOME=/opt/apache-maven
export MAVEN_HOME=/opt/apache-maven
export PATH=${M2_HOME}/bin:${PATH}

sudo chmod +x maven.sh
sudo source maven.sh
maven is successfully configured. when we type mvn --version it should display it version everywhere in the system.
Install maven plugin and configure jenkins for maven
Manage Jenkins-plugins-maven integration

Manage Jenkins-tools-jdk
JDK

Maven

Github

Install git in Ubuntu
sudo apt-get install git
- Let's Create a Job. Select a Maven project


Build


For war file, go to workspace-target-webapp.war


Setup Tomcat server 🐈
Follow DevOpsDemos/Tomcat/tomcat_installation.MD at master · AasifaShaik029/DevOpsDemos (github.com)
Launch a new ubuntu instance and add 8080 rule and execute below commands.
 cd /opt
 wget https://downloads.apache.org/tomcat/tomcat-10/v10.1.11/bin/apache-tomcat-10.1.11.tar.gz.
 tar -xvzf apache-tomcat-10.1.11.tar.gz
 mv apache-tomcat-10.1.11 tomcat
 cd tomcat/
 cd bin

Now execute the startup.sh file to start tomcat.

give ipaddress:8080. you can see our tomcat is running as below

When we click on 'Manage App' it will throw an error. to resolve it
we need to modify these 2 file uncomment value tag
/opt/tomcat/webapps/host-manager/META-INF/context.xml
/opt/tomcat/webapps/manager/META-INF/context.xml

Change username and password for tomcat as weel as below
Update users information in the tomcat-users.xml file goto tomcat home directory and Add below users to conf/tomcat-users.xml file
 <role rolename="manager-gui"/>
 <role rolename="manager-script"/>
 <role rolename="manager-jmx"/>
 <role rolename="manager-status"/>
 <user username="admin" password="admin" roles="manager-gui, manager-script, manager-jmx, manager-status"/>
 <user username="deployer" password="deployer" roles="manager-script"/>
 <user username="tomcat" password="s3cret" roles="manager-gui"/>

And later shutdown and restart the tomcat. Follow the below commands for understanding.
Login now with the user name 'tomcat' and passowrd's3cret'

find / -name context.xml
vim /opt/tomcat/webapps/host-manager/META-INF/context.xml
vim /opt/tomcat/webapps/manager/META-INF/context.xml
vim conf/tomcat-users.xml
 cd ..
vim conf/tomcat-users.xml
 cd bin
   ls
   ./shutdown.sh
    ./startup.sh
Integrating Tomcat server with Jenkins
There is no tomcat plugin available in jenkins so we use deplay to container plugin.

Now add your tomcat credentials to jenkins

<user username="deployer" password="deployer" roles="manager-script"/>
Give these credentials

Deploy to Tomcat
Create a new Job(maven project)


Our build is successful

In tomcat it is deployed


Poll SCM
n Jenkins, "Poll SCM" (Source Code Management) is a feature that allows you to trigger a build of your project based on changes in the version control system (VCS) repository where your source code is stored. This feature is commonly used in CI/CD pipelines to automatically build and test the code whenever there are changes committed to the repository.

Minutes (0-59)
Hours (0-23)
Day of the month (1-31)
Month (1-12)
Day of the week (0-7, where both 0 and 7 represent Sunday)
The asterisk (*) symbol is a wildcard character used to indicate that all possible values for that field are accepted. For example, if you use " * " as the schedule in the "Poll SCM" field, it means that Jenkins will poll for changes every minute. Here's the breakdown of what each asterisk represents:
Minutes: * (Every minute)
Hours: * (Every hour)
Day of the month: * (Every day of the month)
Month: * (Every month)
Day of the week: * (Every day of the week)
Using " * " as the schedule is common when you want Jenkins to check for changes as frequently as possible. However, depending on your project and VCS repository, polling too frequently can lead to unnecessary load on the Jenkins server and the VCS system. It's essential to strike a balance between checking for changes in a timely manner and avoiding excessive polling.
Lets make some change in the code in github.

you can see that build automatically started.


Our app is successfully deployed.
Thank you for your time